Thursday, December 17, 2009
Web Server DNS Updates Complete
The DNS entry for the host server of the OGCE and GCE Workshop websites has been updated. The usual URLs (http://www.collab-ogce.org, etc) should work correctly.
Wednesday, December 16, 2009
OGCE Web Site Problems
We are changing the IP address of the Web server that virtually hosts the www.collab-ogce.org web site. You can access the OGCE site with this URL:
http://gf18.ucs.indiana.edu/ogce/index.php/Main_Page
The GCE08 and 09 workshops can be reached at
http://gf18.ucs.indiana.edu/gce08/index.php/Main_Page
and
http://gf18.ucs.indiana.edu/gce09/index.php/Main_Page
http://gf18.ucs.indiana.edu/ogce/index.php/Main_Page
The GCE08 and 09 workshops can be reached at
http://gf18.ucs.indiana.edu/gce08/index.php/Main_Page
and
http://gf18.ucs.indiana.edu/gce09/index.php/Main_Page
OGCE Cyberaide JavaScript Release
The SC09 stable release of Cyberaide JavaScript is available from http://www.collab-ogce.org/ogce/index.php/JavaScript_COG. You can either check the code out from SVN or download the tar:
SVN Checkout Command: svn checkout https://cyberaide.googlecode.com/svn/tags/cyberaide-javascript-SC09
Tar download link: http://www.collab-ogce.org/ogce/downloads/cyberaide-javascript-SC09.tar.gz
SVN Checkout Command: svn checkout https://cyberaide.googlecode.com/svn/tags/cyberaide-javascript-SC09
Tar download link: http://www.collab-ogce.org/ogce/downloads/cyberaide-javascript-SC09.tar.gz
Tuesday, December 08, 2009
OGCE Gadget Container Added to Nightly Build and Test
The OGCE Gadget Container has been added to the NMI nightly build and test system. To see a dashboard of all tests, go to http://nmi-s003.cs.wisc.edu/nmi/index.php?page=results%2Foverview&opt_project=OGCE.
Monday, December 07, 2009
OGCE Gadget Container REST API
Notes by Gerald Guo, the developer of the gadget container. We are developing a REST API for the gadget container that allows you to work with it programmatically. The following example shows how to add a gadget to a layout using curl. If you prefer, a tool like the Firefox plugin Poster can be used.
Curl example:
1) Authentication
curl -H Connection:keep-alive -d "screenname=testuser&password=testuser"
-v -k -o output.txt -c cookies
https://gf13.ucs.indiana.edu:7443/ishindig-webapp/signin
2) Add a new gadget (Calender gadget)
First, create a file named "gadget.json" with following content:
{ "gadgetname":"Embedded Calendar",
"gadgetspecsrc":"https://gf13.ucs.indiana.edu:7443/gadgets-repo/EmbeddedCale
ndar.xml"}
Then execute this command:
curl -d @gadget.json -H Content-Type:application/json -H
Connection:keep-alive -v -k -c cookies -b cookies
'https://gf13.ucs.indiana.edu:7443/ishindig-webapp/rest/users/@self/layouts/
index/0/tabs/index/0/columns/index/2/gadgets/index/-1'
In the long POST URL, position (consisting of tuple
gadget index>) of the new gadget is specified.
layouts/index/0 : this specifies the layout the gadget will be added to
tabs/index/0 : this specifies the tab the gadget will be added to
columns/index/2 : this specifies the column the gadget will be added to
gadgets/index/-1 : this specifies position of the gadget within
containing column. -1 means appending.
Then you can log in OGCE gadget container via web interface
(https://gf13.ucs.indiana.edu:7443/ishindig-webapp/www/sign.jsp) to check
whether it has been added.
This feature is currently only available in the SVN trunk. It is not part of the SC09 tagged release.
XBaya Workflow Composer as Mashup Builder
WS02 is using and extending XBaya to work as a mashup composer: http://kkpradeeban.blogspot.com/2009/11/this-screen-cast-shows-development-of.htm.
Tuesday, November 24, 2009
OGCE Gadget Container Release
The SC09 tagged release of the OGCE Gadget Container is now available. See http://www.collab-ogce.org/ogce/index.php/OGCE_Gadget_Container for download links and more information. Features include
- Several gadgets pre-configured in the build, including RSS readers, GMail, Google Talk, TeraGrid status monitoring gadgets, and more.
- Support for Social Networking using Google Friend Connect.
- Embedded Apache Shindig container.
- Support for OAuth-secured gadgets.
- Support for OpenID login.
- Administration interfaces.
- Alternate layouts and skins.
- Drag-and-drop gadget layouts.
Friday, November 13, 2009
Using Friend Connect Gadgets in OGCE Gadget Container
Google Friend Connect allows you to easily develop social applications using Open Social, OAuth, and OpenID without requiring detailed knowledge of specifications or software tools. FriendConnect applications are just HTML and JavaScript and can be easily converted into Google Gadgets.
The OGCE Gadget Container comes configured to run FriendConnect applications. However, you must do a few additional steps outside of our build process. These instructions refer to actions you should take at the Friend Connect website.

The OGCE Gadget Container comes configured to run FriendConnect applications. However, you must do a few additional steps outside of our build process. These instructions refer to actions you should take at the Friend Connect website.
- Register with FriendConnect. Click "Get Started" and check the agreement.
- Register your URL. If you are just testing things on localhost, there is no need to do this. The OGCE gadget container comes with a site ID for localhost. This gives you a social network of 1.
- After registering, you will be redirected to your FriendConnect management dashboard. It will have a URL similar to
http://www.google.com/friendconnect/admin/site/overview?id=02963187904381158078 - The number 02963187904381158078 in this example is your site ID.
- Go to the OGCE Gadget Container's config/ishindig.properties file and change the value of site.friendconnectID to your new site ID.
- If you have already built the OGCE Gadget Container before, you will need to redeploy the gadgets. Use the command mvn clean install -f third_party_gadgets/pom.xml.
- You will also need to reload your browser to see the changes if you were logged into the portal.

Wednesday, November 11, 2009
OGCE Gadget Container and OpenID
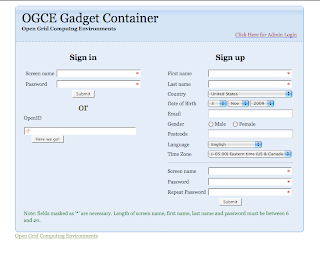
The OGCE Gadget Container lets you associate an OpenID with your login account. You can do this in one of two ways. We will assume you have an OpenID already. Chances are you do, even if you don't realize it. For more information, see http://openid.net/get-an-openid/. For a concrete example, you can use Blogger blogs as OpenID URLs. If you were an owner of this blog, you would type http://collab-ogce.blogspot.com in the OpenID URL fields of the images below.
Your first option is to associate your openID with your gadget portal account when you create first it. Before creating the account, log into your OpenID account by typing its URL in the lower left text field of the login page.

You will be redirected to your OpenID login page. Login and you will be redirected back to the gadget login page (above). Now fill out the form on the right to create a new account.
From now on, you can just type your OpenID URL in the gadget login page and use your OpenID account to login. It will be associated with your user account.
Your second option is to add or update your OpenID URL after you have created an account. To do this, first create an account and login with your portal user name. Then click the the "User Info" button on the upper right tool bar area. You'll get a popup like the one below.

Type your OpenID URL in the field provided (next to last in the image). You can then use your OpenID for future logins instead of your portal password.
Your first option is to associate your openID with your gadget portal account when you create first it. Before creating the account, log into your OpenID account by typing its URL in the lower left text field of the login page.

You will be redirected to your OpenID login page. Login and you will be redirected back to the gadget login page (above). Now fill out the form on the right to create a new account.
From now on, you can just type your OpenID URL in the gadget login page and use your OpenID account to login. It will be associated with your user account.
Your second option is to add or update your OpenID URL after you have created an account. To do this, first create an account and login with your portal user name. Then click the the "User Info" button on the upper right tool bar area. You'll get a popup like the one below.

Monday, November 09, 2009
OGCE Gadget Container Supports HTTPS
Previous posts on the OGCE Gadget Container have used HTTP in the examples, but the latest version in SVN now supports HTTPS/SSL. This applies to all three parts of the system: the layout manager (the visible part), a slightly-patched Shindig gadget container, and locally served gadgets. Remote gadgets using HTTPS can also be embedded. HTTPS support builds out of the box in the usual way ("mvn clean install"). No additional configuration is required.
The big news here is that with our Gadget Container will support "HTML" style gadgets over HTTPS, not just "URL" style gadgets (that is, IFrames). This means you can build SSL-secured gadgets that can take full advantage of the Gadget and Open Social JavaScript APIs.
The big news here is that with our Gadget Container will support "HTML" style gadgets over HTTPS, not just "URL" style gadgets (that is, IFrames). This means you can build SSL-secured gadgets that can take full advantage of the Gadget and Open Social JavaScript APIs.
Tuesday, November 03, 2009
Using the OGCE Gadget Container
The OGCE Gadget Container allows you to deploy and display Google and Open Social gadgets. To get the gadget container, check it out from SourceForge with SVN:
You can also download the tar through SF's source code browser: http://ogce.svn.sourceforge.net/viewvc/ogce/ShindigOGCE/ishindig-trunk.tar.gz?view=tar
Next, cd into the source directory and do the following:
* Unpack Apache Maven (included in the download):
tar -zxf apache-maven-2.2.1.tar.gz; export PATH=/path/to/ogce-gadget-container/apache-maven-2.2.1/bin:$PATH
This will make sure you have the correct version of Maven.
* Edit config/ishindig.properties. Edit site.host to be your server's IP address. You can use localhost if you want. For your first build, don't change the H2 database settings, but you can use MySQL in the future.
* Build and deploy everything by running mvn clean install from the top level directory (ogce-gadget container if you used the svn checkout command above).
* Start Tomcat with startup-tomcat.sh.
You should now point your browser tohttp://your.server.name:7070/ishindig-webapphttps://your.server.name:7443/ishindig-webap. You should see the screen below. Create an account and log in.
 After logging in, you should see a tabbed layout like the one below:
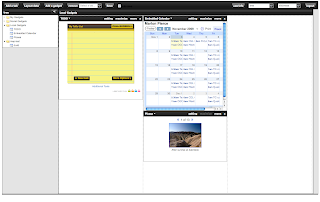
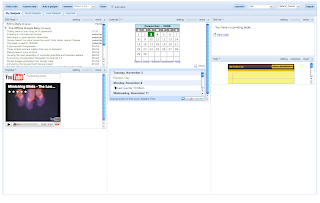 You can move gadgets around by drag and drop. Click the skins layout (drop down on the upper right) to change colors. Click the layout drop down (also upper right) to switch between table and tree layouts. Add tabs by clicking the "add a tab" button. You can create a layout like so:
To add a gadget, click the "Add a gadget" link in the upper left tool bar area. Fill out the form by providing a nickname for the Gadget and the URL to its XML definition.
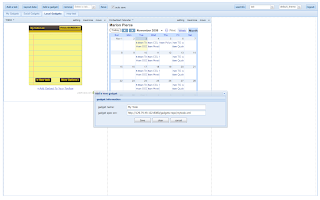 Gadgets can be loaded from anywhere, but we provide a selection that can run locally in the gadgets-repo directory. We render gadgets using Apache Shindig, which is included in the download and deployed by Maven. You can use Shindig to render most gadgets available from iGoogle.
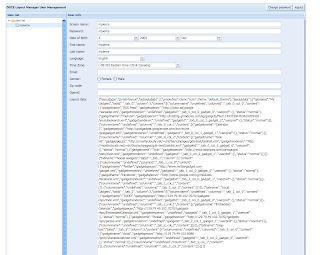
To administer users, click the Admin interface link on the login page and log in as administrator (admin/admin are the defaults).
Finally, you can clean up your installation with the command mvn clean. This will return you to the original SVN check out state, EXCEPT it will not delete the database. If using the default H2 database, the directory for the database files is set in conf/ishindig.properties. By default the directory is located in $HOME/ogce-h2-data/. You must delete this manually.
svn co https://ogce.svn.sourceforge.net/svnroot/ogce/ShindigOGCE/ishindig-trunk/ ogce-gadget-container
You can also download the tar through SF's source code browser: http://ogce.svn.sourceforge.net/viewvc/ogce/ShindigOGCE/ishindig-trunk.tar.gz?view=tar
Next, cd into the source directory and do the following:
* Unpack Apache Maven (included in the download):
tar -zxf apache-maven-2.2.1.tar.gz; export PATH=/path/to/ogce-gadget-container/apache-maven-2.2.1/bin:$PATH
This will make sure you have the correct version of Maven.
* Edit config/ishindig.properties. Edit site.host to be your server's IP address. You can use localhost if you want. For your first build, don't change the H2 database settings, but you can use MySQL in the future.
* Build and deploy everything by running mvn clean install from the top level directory (ogce-gadget container if you used the svn checkout command above).
* Start Tomcat with startup-tomcat.sh.
You should now point your browser to
 After logging in, you should see a tabbed layout like the one below:
 You can move gadgets around by drag and drop. Click the skins layout (drop down on the upper right) to change colors. Click the layout drop down (also upper right) to switch between table and tree layouts. Add tabs by clicking the "add a tab" button. You can create a layout like so:
To add a gadget, click the "Add a gadget" link in the upper left tool bar area. Fill out the form by providing a nickname for the Gadget and the URL to its XML definition.
 Gadgets can be loaded from anywhere, but we provide a selection that can run locally in the gadgets-repo directory. We render gadgets using Apache Shindig, which is included in the download and deployed by Maven. You can use Shindig to render most gadgets available from iGoogle.
To administer users, click the Admin interface link on the login page and log in as administrator (admin/admin are the defaults).

Finally, you can clean up your installation with the command mvn clean. This will return you to the original SVN check out state, EXCEPT it will not delete the database. If using the default H2 database, the directory for the database files is set in conf/ishindig.properties. By default the directory is located in $HOME/ogce-h2-data/. You must delete this manually.
Job Submission and JavaScript Gadgets
This post continues our series on using the Cyberaide JavaScript API for common Grid operations. For more information on downloading and installing the current code, see
http://collab-ogce.blogspot.com/2009/10/using-ogces-javascript-api-to-myproxy.html. If you already have to code, just use svn update from your working directory to get the latest updates.
In previous posts, we took a tour of the APIs for getting a proxy and submitting simple jobs. These have been assembled into a single gadget, cyberaideJobman.xml, located in the client sub-directory. To build , run mvn clean install from the top level cyberaide directory and then start Tomcat with the startup-tomcat.sh script. The gadget will be available from http://your.server.name:8080/grid/cyberaideJobman.xml. This is suitable for testing purposes, but you should modify Tomcat to run SSL. Near-future versions of the build system will do this by default.
You can now point your favorite gadget container (such as iGoogle) to the above URL. Steps for adding a gadget depend on the container. For iGoogle (assuming you have an account), click "Add stuff" in the upper right corner and then "Add feed or gadget" in the lower left corner. Cut and paste your gadget's URL.
Friday, October 30, 2009
OGCE Website Down for Upgrade
We are upgrading the OGCE website (www.collab-ogce.org). The site should be up again soon.
Thursday, October 22, 2009
Making a MyProxy Gadget
In an earlier post we looked at a simple example that described how to build a Web interface to MyProxy with the Cyberaide JavaScript API. Now we will turn it into a gadget. This is straightforward, and you can easily test it out with iGoogle, Apache Shindig, or Google Code's wiki. We can reuse most of the previous example, so we will only discuss changes below.
Step 0: Wrap the HTML and JavaScript in the CDATA section of a new file, MyProxyGadget.xml:
<?xml version="1.0" encoding="UTF-8"?>
<Module>
<ModulePrefs title="MyProxy Gadget"
height="500">
</ModulePrefs>
<Content type="html">
<![CDATA[
Actual code goes here
]]>
</Content>
</Module>
It is also possible to use an iFrame for simplicity. The iframe can be embedded in the CDATA section and point to the HTML file's URL, or you can use a "url" gadget. In this case, change Content's type attribute value from "html" to "url" and provide the URL for the HTML code you want to embed.
Step 1: You will need to use full paths to all imported JavaScript libraries, images, and so on. Relative paths will not work. So for example, you import the CogKit2.js library like so:
<script type="text/javascript" src="https://my.host.com/grid/CogKit2.js"></script>
where my.host.com should be replaced with your Cyberaide deployment server. Note this also applies to the Cyberaide agent server URL. This must be changed from
var url="../agent/services/agent";
to
var url="https://my.host.com/agent/services/agent";
Step 2: You will need to use a modified SOAP JavaScript library, soapclientGadget.js. This replaces soapclient24NSMod.js. This is our modification. The library is available from our SVN repository.
Step 3: Load your gadget in your favorite gadget container. To use iGoogle, create an account and log in if necessary and then click the "Add Stuff" link in the upper right. Assuming you haven't published your gadget yet, click the "Add feed or gadget" link in the lower left side of the page. Type in the full URL to your gadget and submit. That's it.
Tuesday, October 20, 2009
More on JavaScript and Globus GRAM
In the previous post, we looked at how to submit a job using the JavaScript CoG API (a.k.a Cyberaide JavaScript). We'll now look at the remaining parts of the job management API: listing all jobs, checking status of a particular job, listing outputs of a job, and viewing output. We'll just show the JavaScript codes and not the full HTML. The complete example is JobSubGadget.html.
As we saw last time, after a job is submitted, we are returned a job id. We actually treat all jobs as workflows, so this will be colloquially referred to as a wfid in the text. Also as we saw in the last post, all our function calls are accompanied by a callback function. JavaScript is a functional language, so you can pass functions as arguments to other functions. The recipient function then invokes your function.
Listing All Your Jobs
All of your jobs are stored persistently (using a lightweight database and the file system), so you can list all of your jobs' IDs with the function below. The callback function receives a JSON-formatted WFID list, which you can cast directly into a JavaScript variable if you choose.
/*--------------------------------------------------*/
// List jobs
/*--------------------------------------------------*/
function showJobs() {
jscog.listMyWf(listMyWfResponse);
}
//The call back.
function listMyWfResponse(jsonRet){
alert(jsonRet);
}
Checking the Status of a Particular Job
This method returns the status of a particular job as a JSON object. It takes a WFID as input. In the example, we obtain the WFID from the value of an HTML element called "wfid-status". This line of the example is not required.
/*--------------------------------------------------*/
// Check job status
/*--------------------------------------------------*/
function showStatus() {
var wfid=document.getElementById("wfid-status").value;
jscog.statusQuery(wfid,statusQueryResponse,"");
}
//The callback function.
function statusQueryResponse(jsonRet,loc) {
alert(jsonRet);
}
Listing Job Output Files
This function lists the output files associated with a particular WFID. In the previous example, this is the standard output file. Once again the output is JSON-encoded, and the input is obtained from a document element's value (wfid-list in this case). Again, this method for determining the input WFID value is only illustrative.
/*--------------------------------------------------*/
// List job output files
/*--------------------------------------------------*/
function listOutputFiles() {
var wfid=document.getElementById("wfid-list").value;
jscog.listOutput(wfid,listOutputResponse,"");
}
function listOutputResponse(jsonRet) {
alert(jsonRet);
}
Show the Output of a Job
Finally, we can view one of the output files as shown below. The return value is JSON-encoded as before.
/*--------------------------------------------------*/
// Show job output
/*--------------------------------------------------*/
function displayResult() {
var wfid=document.getElementById("wfid-display").value;
var outputfile=document.getElementById("wfid-outputfile").value;
jscog.displayResult(wfid,outputfile,fetchOutputResponse,"");
}
function fetchOutputResponse(jsonRet) {
alert(jsonRet);
}
function fetchOutputResponse(jsonRet,loc) {
alert(jsonRet);
}
Monday, October 19, 2009
Submitting a Grid Job with OGCE JavaScript API
In the previous post, we showed how to get a MyProxy credential with the OGCE's Cyberaide JavaScript API. We'll now look at how to submit a simple job. We'll build up a very simple HTML page to do this, but you should note that we have much more appealing clients than this if you want to use something out of the box.
Let's start by building upon our earlier MyProxyGaget.html example. This file is called JobSubGadget.html and is in the client subdirectory of the source code. We will combine the MyProxy form with a Job Submission form to simplify security issues; that is, the user will be presented with a form to get a proxy credential (shown last time) and a form to launch a job. The job launching form only appears after the user successfully authenticates.
To do this, we will start with a little jQuery trick. We'll wrap the two tables in <div> classes called proxyFormClass and jobSubClass and define the following CSS entries:
.proxyFormClass {
}
.jobSubClass{
display: none;
}
Then in the authentication callback function (see previous post), we put the code snippet below:
$('div.jobSubClass').show();
$('div.proxyFormClass').hide();
This will turn off the proxy form fields and turn on the job submission fields.
Now we're ready for the job submission form itself. Here's a very bare bones one:
<div class="jobSubClass" id="jobSub">
Fill in the form below to launch a job.
<table>
<tr>
<td>Command</td>
<td><input name="cmd" type="text" id="cmd" size="50" value="/bin/ls"/></td>
</tr>
<tr>
<td>Arguments</td>
<td><input name="arg" type="text" id="arg" size="50" value="-l"/></td>
</tr>
<tr>
<td>GRAM Host</td>
<td><input name="rHost" type="text" id="rHost" size="50" value="grid-co.ncsa.teragrid.org"/>
</td>
</tr>
<tr>
<td>GridFTP Host</td>
<td><input name="ftpHost" type="text" id="ftpHost" size="50" value="gridftp-co.ncsa.teragrid.org"/>
</td>
</tr>
<tr>
<td>Standard Output</td>
<td><input name="stdout" type="text" id="stdout" size="50" value="junk-ls.out"/>
</td>
</tr>
<tr>
<td>Provider</td>
<td><input name="provider" type="radio" id="gt2" checked>GT2
<input name="provider" type="radio" id="gt4">GT4</td>
</tr>
<tr>
<div name="submitStatus" id="submitStatus"/>
</tr>
</table>
<input name="button1" type="button" class="runButton" id="button1" onclick="submitJob();return false" value="Submit job"/>
</div>
This should look familiar. One important thing to note (besides the little div wrapper) is that we need to provide the hostname for both the GRAM and GridFTP hosts. We need this to both run the job and pull back the output. Not all grid installations (notably the TeraGrid) run both the GRAM and GridFTP server on the same machine (network file systems), so we have to allow for this.
Now let's look at some minimal JavaScript code to invoke the service. The main thing we need to do is collect the submission form's parameters and invoke the service.
function submitJob() {
/* extract job specification */
var cmd = document.getElementById("cmd").value;
var arg = document.getElementById("arg").value;
var rHost = document.getElementById("rHost").value;
var ftpHost=document.getElementById("ftpHost").value;
var stdout = document.getElementById("stdout").value;
var provider = document.getElementsByName("provider");
var prov = null;
if(provider[0].checked){
prov = "GT2";
}
else {
prov = "GT4";
}
/* construct karajan workflow */
var strProj = jscog.constructRemoteJob(cmd, arg, rHost, stdout, ftpHost, stdout, prov);
document.getElementById("submitStatus").innerHTML = "Job Submitting";
loc="";
jscog.submitWf(strProj,submitResponse,loc);
}
Job submission is actually a two step process in the API: first we construct the job's workflow (we use the CoG's Karajan on the backend), and then we submit the constructed workflow script (jscog.submitWf()). We also need to write a callback handler (submitResponse in the submitWf() command) to see if the job was submitted successfully. Here is a really simple one:
/*
* Callback to handle the submission response.
*/
function submitResponse(ret) {
document.getElementById("submitStatus").innerHTML="Your job has been submitted with workflow ticket "+ret;
}
The callback function gets an integer ret back from the server. If submission was successful, then this integer will be the job ticket, which you can use to query status and get back results or error messages.
Using OGCE's JavaScript API to MyProxy
We are in the process of releasing a JavaScript COG API, Cyberaide, that works with common Grid services like MyProxy, GRAM, and GridFTP. Our goal is to provide a method for embedding these calls into many different frameworks, including non-Java languages and tools such as PHP and Ruby on Rails. We are want to provide tools that can be used to build Open Social gadgets that perform Grid operations.
For a fuller description of the project, see http://cyberaide.org/projects/cyberaide/cyberaide-javascript. To browse or download the working version of the code, see http://code.google.com/p/cyberaide/. The examples (very actively developed) can be built using one command,
mvn clean install
from the cyberaide source's top level directory. Edit the top level pom.xml file's properties first. Use the version of Maven provided in the download. You can also rebuild portions of the system with the command
mvn clean install -f client/pom.xml
where client is one of the project modules. After you build everything, start up Tomcat (use the startup-tomcat.sh convenience script). Point your browser to http://localhost:8080/jsportal.html to see some examples.
To shut down everything, you can use the shutdown scripts (shutdown-tomcat.sh and shutdown-mediator.sh). To see debugging information, check out the log files: agent.log and mediator/mediator.log.
MyProxy API Example
The full example is called "MyProxyGadget.html" and is located in the subdirectory client of the source code. To start, you need a set of HTML input fields as usual:
<table>
<tr>
<div id="authStatus" name="authStatus"/>
</tr>
<tr>
<td>Myproxy Server Host:</td>
<td><input name="host" type="text" id="myproxy.host" size="50" value="myproxy.teragrid.org"/></td>
</tr>
<tr>
<td>Myproxy Server Port:</td>
<td><input name="port" type="text" id="myproxy.port" size="50" value="7512"/></td>
</tr>
<tr>
<td>Myproxy Username:</td>
<td><input name="user" type="text" id="myproxy.user" size="50"/></td>
</tr>
<tr>
<td>Myproxy Passphrase:</td>
<td><input name="password" type="password" id="myproxy.password" size="50"/></td>
</tr>
</table>
<input name="button0" type="button" class="runButton" id="button0" onclick="auth();return false" value="Authenticate"/>
Next, you need to import the COG JavaScript library:
<script type="text/javascript" src="CogKit2.js"/>
Now implement the auth() method from your button's onclick attribute. This should of course be located in a section <script language="javascript" > section.
/* Initialize the JavaScript COG */
var url = "../agent/services/agent";
var jscog = new CogKit2(url);
var authStatus = false;
//Define your auth function here.
function auth(){
//These point to the elements in the table above.
var host = document.getElementById("myproxy.host").value;
var port = document.getElementById("myproxy.port").value;
var user = document.getElementById("myproxy.user").value;
var password = document.getElementById("myproxy.password").value;
//A little window dressing
document.getElementById("authStatus").innerHTML=" Authenticating";
//Now invoke the JS CoG auth method from the imported library.
jscog.auth(host, port, user, password, authResponse);
}
The last argument, authResponse, is a callback function that you can use to determine if authentication was successful or not. A sample implementation is shown below.
/*
* the authenticate callback function
*/
function authResponse(ret) {
if(ret){
authStatus = true;
document.getElementById("authStatus").innerHTML="Authenticated successfully!";
document.getElementsByName("password")[0].value="";
} else{
authStatus = false;
document.getElementById("authStatus").innerHTML="Failed to Authenticate!";
document.getElementsByName("password")[0].value="";
}
}
We'll look at more functions in upcoming posts.
For a fuller description of the project, see http://cyberaide.org/projects/cyberaide/cyberaide-javascript. To browse or download the working version of the code, see http://code.google.com/p/cyberaide/. The examples (very actively developed) can be built using one command,
mvn clean install
from the cyberaide source's top level directory. Edit the top level pom.xml file's properties first. Use the version of Maven provided in the download. You can also rebuild portions of the system with the command
mvn clean install -f client/pom.xml
where client is one of the project modules. After you build everything, start up Tomcat (use the startup-tomcat.sh convenience script). Point your browser to http://localhost:8080/jsportal.html to see some examples.
To shut down everything, you can use the shutdown scripts (shutdown-tomcat.sh and shutdown-mediator.sh). To see debugging information, check out the log files: agent.log and mediator/mediator.log.
MyProxy API Example
The full example is called "MyProxyGadget.html" and is located in the subdirectory client of the source code. To start, you need a set of HTML input fields as usual:
<table>
<tr>
<div id="authStatus" name="authStatus"/>
</tr>
<tr>
<td>Myproxy Server Host:</td>
<td><input name="host" type="text" id="myproxy.host" size="50" value="myproxy.teragrid.org"/></td>
</tr>
<tr>
<td>Myproxy Server Port:</td>
<td><input name="port" type="text" id="myproxy.port" size="50" value="7512"/></td>
</tr>
<tr>
<td>Myproxy Username:</td>
<td><input name="user" type="text" id="myproxy.user" size="50"/></td>
</tr>
<tr>
<td>Myproxy Passphrase:</td>
<td><input name="password" type="password" id="myproxy.password" size="50"/></td>
</tr>
</table>
<input name="button0" type="button" class="runButton" id="button0" onclick="auth();return false" value="Authenticate"/>
Next, you need to import the COG JavaScript library:
<script type="text/javascript" src="CogKit2.js"/>
Now implement the auth() method from your button's onclick attribute. This should of course be located in a section <script language="javascript" > section.
/* Initialize the JavaScript COG */
var url = "../agent/services/agent";
var jscog = new CogKit2(url);
var authStatus = false;
//Define your auth function here.
function auth(){
//These point to the elements in the table above.
var host = document.getElementById("myproxy.host").value;
var port = document.getElementById("myproxy.port").value;
var user = document.getElementById("myproxy.user").value;
var password = document.getElementById("myproxy.password").value;
//A little window dressing
document.getElementById("authStatus").innerHTML="
//Now invoke the JS CoG auth method from the imported library.
jscog.auth(host, port, user, password, authResponse);
}
The last argument, authResponse, is a callback function that you can use to determine if authentication was successful or not. A sample implementation is shown below.
/*
* the authenticate callback function
*/
function authResponse(ret) {
if(ret){
authStatus = true;
document.getElementById("authStatus").innerHTML="Authenticated successfully!";
document.getElementsByName("password")[0].value="";
} else{
authStatus = false;
document.getElementById("authStatus").innerHTML="Failed to Authenticate!";
document.getElementsByName("password")[0].value="";
}
}
We'll look at more functions in upcoming posts.
Wednesday, September 09, 2009
Maven Out of Memory Errors
We have seen some Maven errors compiling the OGCE portal on Mac OS X 10.5 with Java 1.6. To remedy this, set the MAVEN_OPTS environment variable:
(bash) export MAVEN_OPTS="-Xmx1024m -XX:MaxPermSize=128m"
(csh) setenv MAVEN_OPTS "-Xmx1024m -XX:MaxPermSize=128m"
The actual values (1024m and 128m) can be varied if necessary.
The error message output from running "mvn clean install" is shown below.
...
/target/classes
[INFO] ------------------------------------------------------------------------
[ERROR] BUILD FAILURE
[INFO] ------------------------------------------------------------------------
[INFO] Compilation failure
Failure executing javac, but could not parse the error:
The system is out of resources.
Consult the following stack trace for details.
java.lang.OutOfMemoryError: Java heap space
at com.sun.tools.javac.code.Scope$ImportScope.makeEntry(Scope.java:385)
...
Monday, July 06, 2009
Velocity Portlet Bridge Updates
Thanks go to Michel David da Costa for updates to the Velocity Portlet Bridge code. This is used to build various older portlets in OGCE (see for example JobSubmission) and will work in various versions of GridSphere and uPortal.
The code is here:
http://ogce.svn.sourceforge.net/viewvc/ogce/OGCE-Util/VelocityPortlet/trunk/.
You can check this out anonymously using SVN:
svn co https://ogce.svn.sourceforge.net/svnroot/ogce/OGCE-Util/VelocityPortlet/trunk VelocityPortlet
If you prefer, you can also get the tar from http://ogce.svn.sourceforge.net/viewvc/ogce/OGCE-Util/VelocityPortlet/trunk.tar.gz.
To build, use Apache Maven 2.0.x and the command
mvn clean install
Wednesday, June 24, 2009
OGCE TG09 Tech Track Presentation
SlideShare Presentation:
OGCE TG09 Tech Track Presentation
View more OpenOffice presentations from marpierc.
Cloud and Gateway Developer Positions at the Pervasive Technology Institute
We are looking to fill two positions. Please see the full ad below.
++++++++++++++++++++++++++++++++++++++++++++++++++++++++++++++++
The following positions based at IUB and reporting to Marlon Pierce, Assistant Director, Community Grid Labs, is being posted externally. If interested, you must apply online at http://www.jobs.indiana.edu/. Refer to positions number #00034420 and #00034425.
Principal Software Research Engineers - PAE4IT (Two positions available)
Description and Responsibilities:
Indiana University is looking for experienced individuals to fill multiple positions in Cloud computing , Grid computing, and message-oriented middleware development. The positions call for expertise in Web service software development, experience developing Java Messaging Service (JMS) applications and related Enterprise event bus technologies, experience with distributed systems, sensor webs, and/or audio-video systems research and advanced development.
Working independently, the incumbent provides expertise in the evaluation, development, implementation and deployment of specific Cloud Computing, Message-Oriented Middleware, and Grid-related technologies in conjunction with Pervasive Technology Institute and Research Technology staff and collaborators. Investigate research problems in distributed computing systems, develop software using best software engineering practices, publish peer-reviewed research articles in workshops and journals, evaluate existing technologies, supervise staff and graduate students, and oversee all development aspects of Cloud and Grid scientific data and application management. Work with scientific users to develop Cloud and Grid systems. Collaborate with key academic researchers and open source user community including faculty, scientific researchers, and grant stakeholders.
Indiana University's Pervasive Technology was recently awarded a 5 year extension to its core funding from the Lilly Endowment, following its highly successful initial 7 years (as the Pervasive Technologies Laboratories). PTI will be located in Indiana University's new state of the art Research Incubator facility. See http://www.pervasive.iu.edu/ for more information. To date, the PTI laboratories have published more than 880 peer-reviewed papers, have won over $180,000,000 in grants over and above their core funding, and have released and maintain numerous open source software packages. PTI researchers work closely with Indiana University's Research Technology group, who maintain IU's world class cyberinfrastructure, http://racinfo.indiana.edu/cyberinfrastructure/.
Qualifications:
Master's degree in Computer Science or relate technical discipline (such as physics, informatics, engineering) is required. PhD preferred. Ph. D. incumbents must have demonstrated (through peer-reviewed publications and software products) a primary research focus on one or more of the following: a) distributed, parallel, Grid and/or Cloud computing; b) high performance, distributed messaging systems; c) audio/video collaboration systems; and d) security in distributed systems. Incumbents with Master's degree must have five to seven years experience in software development and deployment in the appropriate field or fields.
Requirements include a proven ability to undertake and succeed in innovative research projects, and excellent communication skill (covering scientific article writing, presentation skills, and the ability to work with and lead teams). Experience developing software systems using standard software engineering practices (such as source code management software, build and test systems, etc). For Cloud and Grid incumbents, experience developing Web Services, REST services, scientific workflows, and distributed Web applications on Unix/Linux/Mac OSX and/or Windows. Experience developing applications on Grids using software such as Globus or Condor. Experience developing scientific and research Cloud applications using Amazon Web Services, Microsoft Azure, Google AppEngine, and related systems. Experience developing data-parallel scientific, machine learning, and/or information retrieval algorithms using systems such as Apache Hadoop and Microsoft Dryad. For audio/video stream incumbents, demonstrated knowledge and implementation of standards as well as innovative systems. For message-oriented middleware incumbents, demonstrated sophisticated experience with standard MOM software. MOM incumbents should have experience both with core MOM development (efficient routing, security, reliable delivery) as well as applications.
Ability to foster and maintain collaborations with internal and external academic researchers through a balanced, service-based approach required. Demonstrated ability to learn new technologies and tools. Demonstrated initiative in evaluating and adopting new technologies. Organizational and leadership skills required. Able to operate effectively in a complex and dynamic environment with the capability of functioning as a project leader. Excellent oral and written communication skills. Demonstrated conceptual, analytical, and logical abilities. Ability to interact successfully with staff and faculty in extended consultations; demonstrate enthusiasm for new technologies; and deliver excellent outcomes under high pressure and short deadlines. Excellent communication skills required to interact with people of varying levels of knowledge.
Indiana University is an Affirmative Action/Equal Employment institution.
Monday, June 22, 2009
OGCE Portal 2.5
OGCE Portal 2.5 is available for download. The release includes updates to the XBaya portlet, the addition of the GFAC portlet into the main build, and bug fixes to the GPIR portlet.
You can get the code by either SVN anonymous checkout or by downloading the tar.gz.
SVN Anonymous Checkout: svn co https://ogce.svn.sourceforge.net/svnroot/ogce/tags/ogce-portal-only-2.5-release
Download the Tar: http://ogce.svn.sourceforge.net/viewvc/ogce/tags/ogce-portal-only-2.5-release.tar.gz?view=tar
Sunday, June 21, 2009
Saturday, June 20, 2009
Open Life Science Gateway: Gadgets, Open Social, and JSON-RPC
The Open Life Science Gateway code (developed by Wenjun Wu) demonstrates how to develop science gateways with Google Gadgets, Open Social, JSON-RPC, and other Web 2.0 techniques. Browse code here: http://ogce.svn.sourceforge.net/viewvc/ogce/ogce-olsg/.
You can get the code by anonymous SVN checkout or download the tar.gz.
You can get the code by anonymous SVN checkout or download the tar.gz.
Friday, June 19, 2009
Wednesday, June 17, 2009
OGCE Axis Services 1.0 Tagged
Version 1.0 of the OGCE Axis Services have been tagged. See http://ogce.svn.sourceforge.net/viewvc/ogce/tags/ogce-axis-services-1.0/ This includes the Resource Discovery Service and the Resource Prediction Service. See http://www.collab-ogce.org/ogce/index.php/Main_Page#Key_to_Release_Status for an explanation of our release tagging conventions.
Get the tar: http://ogce.svn.sourceforge.net/viewvc/ogce/tags/ogce-axis-services-1.0.tar.gz?view=tar
Check out from SVN: svn checkout https://ogce.svn.sourceforge.net/svnroot/ogce/tags/ogce-axis-services-1.0
Get the tar: http://ogce.svn.sourceforge.net/viewvc/ogce/tags/ogce-axis-services-1.0.tar.gz?view=tar
Check out from SVN: svn checkout https://ogce.svn.sourceforge.net/svnroot/ogce/tags/ogce-axis-services-1.0
GTLAB TG09 Release Tagged
GTLAB has been tagged. This release includes integration with Tomcat's login, new tags and examples for displaying INCA status information on the TeraGrid, simple support for GridShib invocations, and various bug fixes. See http://ogce.svn.sourceforge.net/viewvc/ogce/tags/GTLAB-tg09/.
Get the tar: http://ogce.svn.sourceforge.net/viewvc/ogce/tags/GTLAB-tg09.tar.gz?view=tar
Check out from SVN: svn co https://ogce.svn.sourceforge.net/svnroot/ogce/tags/GTLAB-tg09
Get the tar: http://ogce.svn.sourceforge.net/viewvc/ogce/tags/GTLAB-tg09.tar.gz?view=tar
Check out from SVN: svn co https://ogce.svn.sourceforge.net/svnroot/ogce/tags/GTLAB-tg09
Tuesday, June 16, 2009
Tagged Releases for GFAC and XRegistry Services
Latest stable release versions of the GFAC and XRegistry services are available for download from our SourceForge repository. This is part of the "TeraGrid 09" release of OGCE software, one of our two major updates this year. OGCE portal software tag releases are in preparation.
Tar Bundles:
XRegistry: http://ogce.svn.sourceforge.net/viewvc/ogce/tags/xregistry-tg09.tar.gz?view=tar
GFAC: http://ogce.svn.sourceforge.net/viewvc/ogce/tags/sgfac-tg09.tar.gz?view=tar
SVN Anonymous Checkout
XRegistry: svn co https://ogce.svn.sourceforge.net/svnroot/ogce/tags/xregistry-tg09
GFAC: svn co https://ogce.svn.sourceforge.net/svnroot/ogce/tags/sgfac-tg09
Thursday, June 04, 2009
Wednesday, June 03, 2009
OGCE-Utils and Small SVN Reorganization
The Proxy Manager API and Velocity Portlet Bridge code have been moved to the new OGCE-Util directory in SVN (see http://ogce.svn.sourceforge.net/viewvc/ogce/OGCE-Util). The util directory in general is for standalone applications with jar (rather than war) targets that may get used by other projects.
XRegistry Added to NMI Build and Test
The OGCE XRegistry service (http://www.collab-ogce.org/ogce/index.php/XRegistry) has been added to the NMI nightly build system. See http://nmi-s003.cs.wisc.edu/nmi/index.php?page=results%2Foverview&opt_project=OGCE for all builds.
Friday, May 29, 2009
OGCE Axis Services Added to Nightly Build
Nightly builds of the OGCE Axis Services (http://www.collab-ogce.org/ogce/index.php/OGCE-Axis-Services) are now running on the NMI Testbed at the University of Wisconsin. We perform automated builds for Mac OSX and several flavors of Linux. See http://nmi-s003.cs.wisc.edu/nmi/index.php?page=results%2Foverview&opt_project=OGCE for additional information.
Friday, May 22, 2009
OGCE Tutorial at SciDAC
We will participate in the "TeraGrid Gateways" portion of the SciDAC tutorials, June 19th. See https://outreach.scidac.gov/scidac09/tutorials/ for details.
Friday, May 15, 2009
OGCE Presentation at TG09
OGCE has an accepted presentation for TG09, Wednesday June 24th, 2:30-3:00 pm. See full TG09 schedule at
http://www.teragrid.org/tg09/index.php?option=com_content&task=view&id=62
http://www.teragrid.org/tg09/index.php?option=com_content&task=view&id=62
TG09 Tutorial on Science Gateways
OGCE team members will give a Science Gateway tutorial at TeraGrid 09 on Monday, July 22nd. The full abstract is here: http://www.teragrid.org/tg09/index.php?option=com_content&task=view&id=56
Subscribe to:
Posts (Atom)