- Several gadgets pre-configured in the build, including RSS readers, GMail, Google Talk, TeraGrid status monitoring gadgets, and more.
- Support for Social Networking using Google Friend Connect.
- Embedded Apache Shindig container.
- Support for OAuth-secured gadgets.
- Support for OpenID login.
- Administration interfaces.
- Alternate layouts and skins.
- Drag-and-drop gadget layouts.
Tuesday, November 24, 2009
OGCE Gadget Container Release
The SC09 tagged release of the OGCE Gadget Container is now available. See http://www.collab-ogce.org/ogce/index.php/OGCE_Gadget_Container for download links and more information. Features include
Friday, November 13, 2009
Using Friend Connect Gadgets in OGCE Gadget Container
Google Friend Connect allows you to easily develop social applications using Open Social, OAuth, and OpenID without requiring detailed knowledge of specifications or software tools. FriendConnect applications are just HTML and JavaScript and can be easily converted into Google Gadgets.
The OGCE Gadget Container comes configured to run FriendConnect applications. However, you must do a few additional steps outside of our build process. These instructions refer to actions you should take at the Friend Connect website.

The OGCE Gadget Container comes configured to run FriendConnect applications. However, you must do a few additional steps outside of our build process. These instructions refer to actions you should take at the Friend Connect website.
- Register with FriendConnect. Click "Get Started" and check the agreement.
- Register your URL. If you are just testing things on localhost, there is no need to do this. The OGCE gadget container comes with a site ID for localhost. This gives you a social network of 1.
- After registering, you will be redirected to your FriendConnect management dashboard. It will have a URL similar to
http://www.google.com/friendconnect/admin/site/overview?id=02963187904381158078 - The number 02963187904381158078 in this example is your site ID.
- Go to the OGCE Gadget Container's config/ishindig.properties file and change the value of site.friendconnectID to your new site ID.
- If you have already built the OGCE Gadget Container before, you will need to redeploy the gadgets. Use the command mvn clean install -f third_party_gadgets/pom.xml.
- You will also need to reload your browser to see the changes if you were logged into the portal.

Wednesday, November 11, 2009
OGCE Gadget Container and OpenID
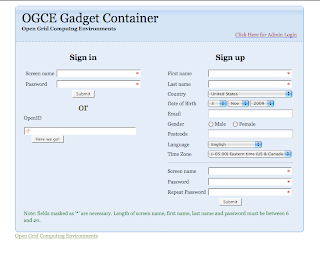
The OGCE Gadget Container lets you associate an OpenID with your login account. You can do this in one of two ways. We will assume you have an OpenID already. Chances are you do, even if you don't realize it. For more information, see http://openid.net/get-an-openid/. For a concrete example, you can use Blogger blogs as OpenID URLs. If you were an owner of this blog, you would type http://collab-ogce.blogspot.com in the OpenID URL fields of the images below.
Your first option is to associate your openID with your gadget portal account when you create first it. Before creating the account, log into your OpenID account by typing its URL in the lower left text field of the login page.

You will be redirected to your OpenID login page. Login and you will be redirected back to the gadget login page (above). Now fill out the form on the right to create a new account.
From now on, you can just type your OpenID URL in the gadget login page and use your OpenID account to login. It will be associated with your user account.
Your second option is to add or update your OpenID URL after you have created an account. To do this, first create an account and login with your portal user name. Then click the the "User Info" button on the upper right tool bar area. You'll get a popup like the one below.

Type your OpenID URL in the field provided (next to last in the image). You can then use your OpenID for future logins instead of your portal password.
Your first option is to associate your openID with your gadget portal account when you create first it. Before creating the account, log into your OpenID account by typing its URL in the lower left text field of the login page.

You will be redirected to your OpenID login page. Login and you will be redirected back to the gadget login page (above). Now fill out the form on the right to create a new account.
From now on, you can just type your OpenID URL in the gadget login page and use your OpenID account to login. It will be associated with your user account.
Your second option is to add or update your OpenID URL after you have created an account. To do this, first create an account and login with your portal user name. Then click the the "User Info" button on the upper right tool bar area. You'll get a popup like the one below.

Monday, November 09, 2009
OGCE Gadget Container Supports HTTPS
Previous posts on the OGCE Gadget Container have used HTTP in the examples, but the latest version in SVN now supports HTTPS/SSL. This applies to all three parts of the system: the layout manager (the visible part), a slightly-patched Shindig gadget container, and locally served gadgets. Remote gadgets using HTTPS can also be embedded. HTTPS support builds out of the box in the usual way ("mvn clean install"). No additional configuration is required.
The big news here is that with our Gadget Container will support "HTML" style gadgets over HTTPS, not just "URL" style gadgets (that is, IFrames). This means you can build SSL-secured gadgets that can take full advantage of the Gadget and Open Social JavaScript APIs.
The big news here is that with our Gadget Container will support "HTML" style gadgets over HTTPS, not just "URL" style gadgets (that is, IFrames). This means you can build SSL-secured gadgets that can take full advantage of the Gadget and Open Social JavaScript APIs.
Tuesday, November 03, 2009
Using the OGCE Gadget Container
The OGCE Gadget Container allows you to deploy and display Google and Open Social gadgets. To get the gadget container, check it out from SourceForge with SVN:
You can also download the tar through SF's source code browser: http://ogce.svn.sourceforge.net/viewvc/ogce/ShindigOGCE/ishindig-trunk.tar.gz?view=tar
Next, cd into the source directory and do the following:
* Unpack Apache Maven (included in the download):
tar -zxf apache-maven-2.2.1.tar.gz; export PATH=/path/to/ogce-gadget-container/apache-maven-2.2.1/bin:$PATH
This will make sure you have the correct version of Maven.
* Edit config/ishindig.properties. Edit site.host to be your server's IP address. You can use localhost if you want. For your first build, don't change the H2 database settings, but you can use MySQL in the future.
* Build and deploy everything by running mvn clean install from the top level directory (ogce-gadget container if you used the svn checkout command above).
* Start Tomcat with startup-tomcat.sh.
You should now point your browser tohttp://your.server.name:7070/ishindig-webapphttps://your.server.name:7443/ishindig-webap. You should see the screen below. Create an account and log in.
 After logging in, you should see a tabbed layout like the one below:
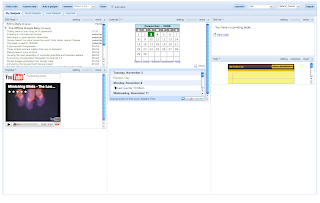 You can move gadgets around by drag and drop. Click the skins layout (drop down on the upper right) to change colors. Click the layout drop down (also upper right) to switch between table and tree layouts. Add tabs by clicking the "add a tab" button. You can create a layout like so:
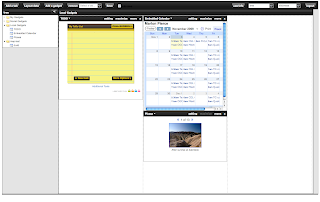
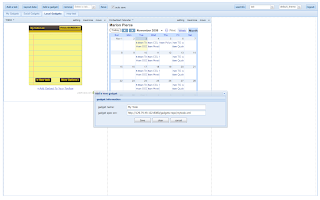
To add a gadget, click the "Add a gadget" link in the upper left tool bar area. Fill out the form by providing a nickname for the Gadget and the URL to its XML definition.
 Gadgets can be loaded from anywhere, but we provide a selection that can run locally in the gadgets-repo directory. We render gadgets using Apache Shindig, which is included in the download and deployed by Maven. You can use Shindig to render most gadgets available from iGoogle.
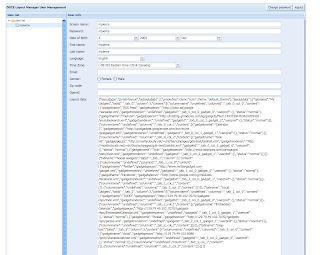
To administer users, click the Admin interface link on the login page and log in as administrator (admin/admin are the defaults).
Finally, you can clean up your installation with the command mvn clean. This will return you to the original SVN check out state, EXCEPT it will not delete the database. If using the default H2 database, the directory for the database files is set in conf/ishindig.properties. By default the directory is located in $HOME/ogce-h2-data/. You must delete this manually.
svn co https://ogce.svn.sourceforge.net/svnroot/ogce/ShindigOGCE/ishindig-trunk/ ogce-gadget-container
You can also download the tar through SF's source code browser: http://ogce.svn.sourceforge.net/viewvc/ogce/ShindigOGCE/ishindig-trunk.tar.gz?view=tar
Next, cd into the source directory and do the following:
* Unpack Apache Maven (included in the download):
tar -zxf apache-maven-2.2.1.tar.gz; export PATH=/path/to/ogce-gadget-container/apache-maven-2.2.1/bin:$PATH
This will make sure you have the correct version of Maven.
* Edit config/ishindig.properties. Edit site.host to be your server's IP address. You can use localhost if you want. For your first build, don't change the H2 database settings, but you can use MySQL in the future.
* Build and deploy everything by running mvn clean install from the top level directory (ogce-gadget container if you used the svn checkout command above).
* Start Tomcat with startup-tomcat.sh.
You should now point your browser to
 After logging in, you should see a tabbed layout like the one below:
 You can move gadgets around by drag and drop. Click the skins layout (drop down on the upper right) to change colors. Click the layout drop down (also upper right) to switch between table and tree layouts. Add tabs by clicking the "add a tab" button. You can create a layout like so:
To add a gadget, click the "Add a gadget" link in the upper left tool bar area. Fill out the form by providing a nickname for the Gadget and the URL to its XML definition.
 Gadgets can be loaded from anywhere, but we provide a selection that can run locally in the gadgets-repo directory. We render gadgets using Apache Shindig, which is included in the download and deployed by Maven. You can use Shindig to render most gadgets available from iGoogle.
To administer users, click the Admin interface link on the login page and log in as administrator (admin/admin are the defaults).

Finally, you can clean up your installation with the command mvn clean. This will return you to the original SVN check out state, EXCEPT it will not delete the database. If using the default H2 database, the directory for the database files is set in conf/ishindig.properties. By default the directory is located in $HOME/ogce-h2-data/. You must delete this manually.
Job Submission and JavaScript Gadgets
This post continues our series on using the Cyberaide JavaScript API for common Grid operations. For more information on downloading and installing the current code, see
http://collab-ogce.blogspot.com/2009/10/using-ogces-javascript-api-to-myproxy.html. If you already have to code, just use svn update from your working directory to get the latest updates.
In previous posts, we took a tour of the APIs for getting a proxy and submitting simple jobs. These have been assembled into a single gadget, cyberaideJobman.xml, located in the client sub-directory. To build , run mvn clean install from the top level cyberaide directory and then start Tomcat with the startup-tomcat.sh script. The gadget will be available from http://your.server.name:8080/grid/cyberaideJobman.xml. This is suitable for testing purposes, but you should modify Tomcat to run SSL. Near-future versions of the build system will do this by default.
You can now point your favorite gadget container (such as iGoogle) to the above URL. Steps for adding a gadget depend on the container. For iGoogle (assuming you have an account), click "Add stuff" in the upper right corner and then "Add feed or gadget" in the lower left corner. Cut and paste your gadget's URL.
Subscribe to:
Posts (Atom)